Showing posts with label Work in Progress. Show all posts

Tuesday 15 August 2017

Projects, Projects, Projects!!

Hi All

Bluddtoof here, been a while since I posted and quite a while since I engaged in any painting too, what with a hot spell, a wedding and a major project in the garden.
I've got my motivation back now though and some time for the hobby, so I thought I'd just post a little update on my recent work and plans for the rest of the year...

So as you can see in some of my posts from this year I've started a 30k Imperial Fists army, currently part way through a breacher squad...


They'll need to be finished.....

However I kick started my mojo by jumping back to my 2nd Imperial Knight, a Questoris Magaera...


I'm gonna finish this bad boy before jumping to anything else, next will be the breachers to finish, then the Ork Burna Bomma I started a while ago and a Thunderbolts Contemptor I started even longer ago! And then of course I need to finish up my Blood Bowl Dwarves and Orcs

Posts for the Imperial Fists are here

Posts for the Blood Bowl teams are here , and here , and also here

and Posts for the Contemptor are here

Then once all of those projects are done I'm going to tackle my Stag present from the Code boys......
...an Acastus Knight Porphyrion! Love those Guys!!

So that's me done for now, stay tuned for progress reports over the next few months and hopefully by the end of the year all that will be done.

Bluddtoof


Sunday 17 April 2016

Spartan Assault Tank - FW's Hardest Kit to Build?

Evening All,

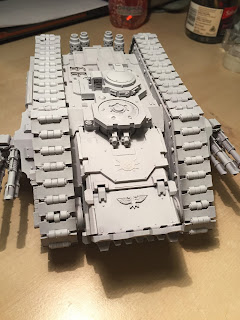
Not been on here in a little while but have successfully built the hardest GW kit in the world the Spartan Tank.  More specifically the version before they changed the design and molded it with the tracks on.  I also made the mistake of trying to carry on with this when in a foul mood!  That as we all know simply doesn't work!

Anyway here is a few pictures showing the tank at various stages including the track bodge I ended up doing.  Once it is all painted and weathered I will cover up these issues.  For anyone else attempting this version of the kit GOOD LUCK.....

God Bless the elastic bands and the stolen from the better half hair bands!


Major track issues stemming from the front not being positioned right (during in the night in question!)


Picked the forgeworld brass etch for this tank.


The next two photos show the tank in primer and me starting to lay down the shadows.


Genuinely hated this build so glad it is out the way now.  This is not my current painting project but I will return to it in the next few months.

Thoughts on your experience with this kit would be interesting and also any good stories about when you should stop modelling might help!

Cheers

DOC Out!

Saturday 2 April 2016

Cerastus Knight Acheron - The Build

Morning All,

Today I am sharing the build process for my Knight Acheron.  I have to say first off GW the instructions are rubbish! and has clearly been photocopied lots of times!

Anyway this my first forgeworld knight my other knight is a plastic kit.  The first thing to do is wash all the parts and make sure all the parts are present.  One of my friends has recently had a problem with forgeworld not wanting to replace a missing part without proof of purchase.  This was very frustrating after I was with him when he bought it for cash at a forgeworld open day.  Anyway after proving he ordered some other stuff for delivery on the same day they relented.  So guys advice is keep or get a receipt and check the parts when you get home even if you don't intend to build it in the near future.

The next thing I did because I knew I would do the build over several days is split the parts into sections bag them and label them as can be seen in the first picture below.

The first section I constructed was the body and cockpit, I have to say no matter what I did I couldn't get this to fully line up so in the end I went with best fit and have since filled the minor gaps with green stuff.  Top tip for any new folk out there elastic bands!  Also leave it a good while to go off.


Next I cleaned up all the armour panels although I have no intention of gluing any to the model until after the paint job has been completed.  Next top tip be careful around the thin bits of resin as you can see from the next picture.  I should not of used cutters in this area.  I think gently cutting away with a sharp knife would of been more sensible. I have since fixed this with green stuff and hopefully after painting and weathering you wont be able to tell!


At this stage I then realised I needed to design the base to allow me to start constructing up from the ground.  So I toyed with full city fight ruins and so on but then thought I don't always use models on city fight terrain.  So I scaled back to the design below and aim to have the one foot stood on the barrel.  The fantasy grave stone is more for a bit of fun and will be adorned with one of the code40ker's name for a laugh!  The knight head will also be painted to match one of the code players knights.


So from this point on I started to pick up speed as the excitement takes you onwards.  First thing was working out the foot on top of the barrel and I actually drilled and pinned the foot to it.   Once I had the first foot in place I blue tacked up the legs to work out where to position foot number two.  I wanted to ensure the hip joint wouldn't look to unnatural.


Ok so now I got really excited and stopped taking pictures of the process (woops).  So the next picture shows all the sub assemblies ready for painting.  I will say I used the hairdryer as per the instructions on the cables on the back of the legs.  Next top tip "You literally only need it on for 10 seconds tops"  any more and it goes very floppy.


Well that is the completed sub assemblies next I will consider a colour scheme as my other knight is Gerantus the Forgotten Knight (who can be found here) I will need to consider whether I go with another freeblade or consider a knight household?

Any questions, tips or thoughts please comment constructively below.

Cheers

DOC

Wednesday 17 December 2014

Forgemas 14: Sevrin Loth and Honour Guard Part 2

I have completed the base coats of the main colour areas and done some of the shading on the yellow. Unfortunately I thought I had taken more photos throughout the painting process, but I can only find these 3.

Here is Loth.


I am happy with the way the armour is going. I may need to but a thin blue glaze over it to tone it down. I am always worried that my highlights look too much so I normally ER on the side of caution. This time I am going a bit brighter to see how it works.


The honour guard are also going well. My only criticism of the kit is that the legs are a bit plain. Maybe GW will upgrade the command squad kit or release a specific honour guard kit which has a bit more blingy models. I know the current standard kit is available but that is specifically Ultramarines.


Finally I have started the banner.


Tuesday 24 June 2014

Imperial Knight Freeblade, work in progress...starting the paintjob.

Hi All

Time to show the WIP on my Imperial Knight, I started on the legs and have now just got the guard plates on waist, thighs, knees and feet to do before I paint the base.
The plates will be red and bone and will feature the knights personal heraldry.
Here's pics of the wip...


I'm really pleased so far, particularly with the gold, it's layers of balthazar gold, old shining gold and auric armour gold on a base of old vermin brown, highlighted with silver and then washed with yellow glaze to give it a really bright finish.
Also a new one for me is the green cables, I normally just use a wash over the base, this time I used hexus pale sun dry paint to put a really light dry brush over the moot green base and then washed with green glaze, not sure if it shows in the photos but it works well in the flesh.

As ever feedback is always welcome.

That's it so far, more to come soon......

Bluddtoof

Saturday 12 April 2014

The Final Deadzone Building

Hi All

I've finished the last building in my first set of deadzone terrain. Really pleased with this one too. I think I've got the verdigris effect a little better than on some of the other pieces.
Here's some piccies....


All I've got left are a few scatter pieces and then the first set is done and I can get on with the rest of my Plague strike team.

More to come soon....

Bluddtoof

Wednesday 2 April 2014

Making a New Thunderwolf (bear) Lord

Hi All,

Doc is back to talk about my new thunderwolf mounted space wolf lord.  One problem with that statement he's actually mounted on a bear!  I'm a big fan of using alternative models to make my army stand out if possible.  So last year I went down to London and went in Dark Sphere and picked up Scibor's Celtic Lord mounted on a bear.


Friday 28 March 2014

The Deadzone Expands, more w.i.p.

Hi All

So here's the latest on my Deadzone work. I've finished the tower and the first Stage 2 infected.

Here's the tower, before and after the metallic finish,


Still not decided on the finishing touches so I'll do all them at once the terrain sets all painted.
Also thought I should state the colour sequence I used to get this finish;
A mid grey spray undercoat (plasticoat), nuln oil wash over all the recesses, administratum grey base coat on all the panels, heavy dry brush celestra grey then ulthuan grey then light dry brush ceramite white over all the grey panels, next is the detail colour sections in either red, blue, green or yellow. Red is wazdakka red base then layers of mephiston red and evil suns scarlet and an edge highlight of ess mixed with a little white, finish with red glaze. Blue is the old enchanted blue with an edge highlight mixing in a little white and finished with blue glaze. Green is the VERY old snot green and an edge highlight and then green glaze. Yellow is base of averland sunset to deal with the natural translucency of yellow paint, layers of yriel yellow, flash gitz yellow and an edge highlight using a little white again and you guessed it a yellow glaze.
Next I paint all the areas which will be metallic in a mid brown, doesn't matter which you choose but I've used the old GW vermin brown, then its balthazar gold and hashut copper layers followed by a highlight of runefang steel and a wash of agrax earthshade, once that's fully dry wash with nihilakh oxide and after that's dry touch up with hashut copper to bring the copper colour back in patches, I got this method from an article in white dwarf November 2013.
All the paints are GW including the glazes which I absolutely love!

The finished Stage 2, before and after the base completion,


I feel I should also give you an idea of the colours I've used here too;
After the base and wash on all the exposed flesh and natural armour plating it's lots of drybrushing!
The armour plates are brought to a paler finish than the flesh simply by using paler yellows and white after the reds, oranges and yellows of the flesh.
The order of colours is; wazdakka red, mephiston red, evil suns scarlet, 50/50 ess/blazing orange(old GW), blazing orange, fiery orange(old GW), 50/50 fo/yriel yellow, light yriel yellow. Flesh stops here. Armour continues with flash gitz yellow, bad moon yellow(old GW), hexos pale sun(new GW drybrush) and finally a light brush of white.
Then to finish off the teeth and claws are painted in layers using the same colours from yriel yellow onwards on top of a base of averland sunset. Also any stand out veins or pustules are apinted in yellows as are the eyes.
The bases use all the same colour systems from the terrain set.

And finally the team members I've done so far in situ with the tower,


A bit more terrain to do yet and the rest of the plague team, more to post in the coming weeks.

Bluddtoof

Wednesday 26 March 2014

Deadzone Battlezone Grows.......WIP

Hi all,

In the middle of my days off between night shifts so I've been busy beavering away on my Deadzone scenery and plague models. Here's a couple of pics of my latest terrain piece w.i.p.


As you can see the grey is all done as is the red detail sections, these coloured sections will have some kind of text or symbolism on them throughout the terrain set once it's all done I just haven't decided quite what yet. The brown is the base coat for the metallic sections.

More to come, including the next team member, a plague stage 2....


This is the base wazdakka red with a wash of carroburg crimson (both GW paint range)

Bluddtoof

Sunday 23 March 2014