Hi All
Bluddtoof here with the next instalment of our narrative campaign; "The Cypra Incident".
Doc and I have been at this a while now and we both agree it's a fantastic way to play the game
(the best way and we've painted so much stuff as a result! ed doc), the story is evolving as we play and creates it's own branches through the vagaries of dice driven events.
This was the first mission in the story which would use 8th edition and we were both interested to see how the new rules set would work with our flexible approach to the game in this campaign, (we don't use formations or org charts or detachments, we merely put together lists of units which we feel would fit with each mission premise.) The result was I must say excellent! 8th is by far my favourite edition so far and has a built in flexibility which works well with an easy going narrative style of play. I'd recommend you give it a go.
So on to the guts of this bat rep....
Why mission 4a? I hear you ask...
Our plan after mission 3; "Running the Gorklet" was to play mission 4 "Airfield Assault" as the next mission in the tree after the Dicers' partial victory. However with lives getting in the way and our natural tendency to flit from project to project, there was no way we could get everything we needed done by the end of this year. (We need to build and paint an airfield, complete with control tower, hanger and workshop as well as emplacements and not to mention another Ork flyer and 2 more Imperial flyers!!) So we wanted to and had the chance to play, we decided to create an offshoot mission from the tree and came up with 4a......
Current mission tree...
As you can see mission 4a sits off to the side and will have long running effects into the campaign and future missions. We are now preparing for the Airfield Assault. The offshoots of 4a will be played next year.
So mission 4a.....
"The Marshalling Yards"
Back story...
During mission 3 "Running the Gorklet" the Dicers recon force escaped from Ork territory with partial intel to allow them a better strategic understanding of Ork dispositions on the planet, in addition the highly perceptive ratlings spotted signs of major Ork vehicle movement from the main valley leading deeper into the wastelands and signs of industrialisation. This data was assessed and a mission approved to investigate and intercede as deemed appropriate by the mission commander.
The Mission;
Crucible of War; Sabotage.
With a few adjustments; The building is swapped for a powered down Stompa currently under construction, which is moved further from the Attackers deployment zone to allow for Docs list which includes vehicles. We didn't want him to blitz the target and win in 2 turns but since this army is new and his painted collection only just meets the 100 power we set for game size we are limited in applying the mission recommended lists.
Ork reserves represent nearby mobs answering the call to war after the Dicers incursion. The Ork plan is to march on the Dicers main base with a mighty Stompa at the head of the assault! With this mechanical monster they cannot lose!!!!
The Dicers force will approach stealthily under cover of darkness during a raging thunder storm and with the cacophony of industrial activity around the Stompa even the Imperial vehicles should be able to approach undetected. Ork sentries are patrolling the area so The Dicers must take care, once the alarm is sounded nearby mobs will respond quickly to the attack.
The Dicers goal is to reach the Stompa and place demo charges, with their current strength the Imperial forces on the planet would be hard pressed to withstand a massed Ork assault and a Stompa would be a devastating threat!
The Lists;
Ork defenders..
MISSION 4A ORKS LIST
VANGUARD
DETACHMENT +1CP, TOTAL = 4CP
CP SPEND PRE
SETUP; -2CP = EXTRA SENTRIES
2CP LEFT FOR
BATTLE, TO BE USED FOR “CUT THE WIRE”
POWER
|
ROLE
|
UNIT
|
WARGEAR AND OPTIONS
|
5
|
HQ1
|
BIG MEK
|
Kustom
force field, grot oiler
|
3
|
EL1
|
MEK
|
Kustom mega
blasta, grot oiler
|
3
|
EL2
|
MEK
|
Kustom
mega blasta, grot oiler
|
9
|
EL3
|
10x BURNA
BOYZ
|
|
4
|
EL4
|
5x
TANKBUSTAS
|
Boss nob,
2x bomb squigs
|
5
|
TR1
|
10x BOYZ
|
Slugga/choppa,
boss nob, powerklaw
|
5
|
TR2
|
10x BOYZ
|
Slugga/choppa,
boss nob, powerklaw
|
9
|
TR3
|
20x BOYZ
|
Shootas,
big shoota, rokkit launcha, boss nob, big choppa, kombi shoota/rokkit launcha
|
15
|
TRANS
|
3x TRUKKS
|
-
|
6
|
FA1
|
4x GROT
TANKS
|
Kommanda,
5x grotzookas
|
7
|
FA2
|
GROT MEGA
TANK
|
2x rokkit
racks, 2x big shootas, rokkit launcha
|
19
|
HVY1
|
GORKANAUT
|
|
10
|
HVY2
|
3x KILLA
KANZ
|
3x
grotzookas
|
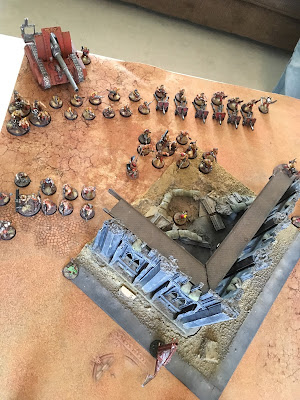
The Dicers force approaches the construction site under darkness amid a violent storm, the noise of their engines drowned by the storm and sounds of industry. Ork and Gretchin sentries patrol the area.
Imperial infantry units approach lone sentries and quickly and quietly dispatch them whilst heavy weapons and tanks move into position to provide cover and support for the infantry push to the target. The Dicers air support, in the form of a Valkyrie, holds station out of sight awaiting the call to attack and deploy the veterans it carries.
As the Dicers push deeper into the yard they encounter more sentries and now hulking Orks with brutal shooters and rusted choppas are encountered.
As the Dicers forward elements engage the first Ork sentries, their armour pushes up the left flank. The Orks prove tough in a fight and one survives the Dicers sneak attack! Guttural Ork curses ring through the night and his shoota fire raises the alarm!!!! The Ork reserves approach from the flanks, the element of surprise is gone with the Dicers half way to their target. Now they must drive for the Stompa and hope they can plant sufficient charges before the Orks overwhelm them!
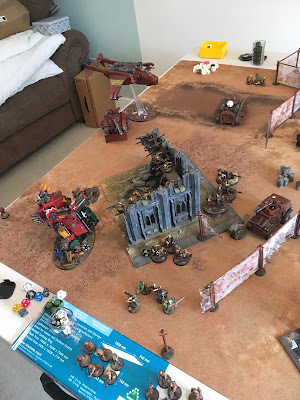
The first waves of Orks enter the fray, including a hulking Gorkanaut which quickly dispatches the Dicers artillery support and then pushes into the ruined building to threaten the heavy weapon teams. Ork trukks race in from the flank to attack the infantry squads, on the opposite flanks Grot vehicles attack the Imperial transports and tanks.
The Imperials grind across the yard, constantly pushing towards the target but sustaining constant attrition from the flanks. Their support section suffers massive losses at the hands of the Gorkanaut, even with Imperial sanctioned psykers throwing smite after smite at the behemoth!!
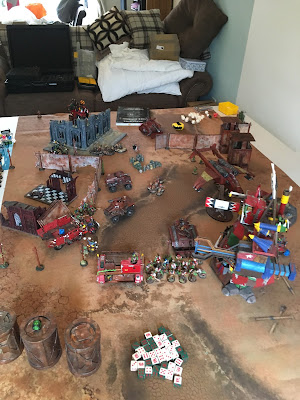
The last of the Ork reserves enter the fray and the Dicers are under pressure, their armour has caused huge losses in the Grot armour but has suffered itself. The Ork trukks have pressed into the centre field and the battle becomes a meat grinder with flailing weapons, whirling buzz saws and screams filling the night. The Valkyrie enters play and tries to find a safe LZ to drop its payload of veterans!
In the dying moments of the battle with the turn counter rapidly approaching the end, the Valkyrie prepositions and the Vets daringly leap out, another vet team makes a mad dash for the stompa from out of the melee and between them the two teams plant charges! The nearby Orks have been waiting for this and they desperately run around cutting the wires!
As the Dicers pull together and start their retreat, with more and more Ork reinforcements approaching, the mission commander triggers the explosive charges.........
.....Nothing!!!!!!
The Ork defenders successfully cut the wires and protected the mighty Effigy of Mork (or possibly Gork)!!
The Dicers pull back under heavy fire, dragging their wounded. Long range artillery barrage covers their retreat and the next stage of the Cypra Incident looms large......
Aftermath:
We had a blast with this mission, the sentries were incredibly lucky with armour saves and the random movement lent a great sense of drama, Doc was funny to watch as he agonised over decisions as to advance? charge? overwhelming force? My decision to use cps for extra sentries was a good one. without the second set Docs approach would have much easier and the alarm may not have been sounded early enough if at all!!
The balance between target location and vehicles in Docs list was a difficult one, as the game progressed we were very flexible with the turn counter, not starting it until the alarm sounded in the end. Even with that extension of game length Doc barely made it to the target in time and only managed to plant 2 charges. His final roll was modified by my single cut the wires stratagem so at +1, he needed a 6!
Doc made good use of the silenced weapons stratagem in the early stages, sniping several Grot sentries to allow his infantry to approach unmolested. It was only a single incredibly lucky Ork who rolled double 6 for his armour saves which sounded the alarm!
A great game and another example of how much fun this more flexible approach the the system can provide excellent results. The story advances...
Next.....
So the outcome of this mission was an Ork Victory, this means I will be allowed to field Stompas in later missions however currently the Orks don't have an adequate power source for the machine.
A future mission entitled "The Power Source" will see an Ork expedition into the arctic region of the planet to locate a hidden Imperial weapons factory where records show a huge cache of heavy Imperial vehicles and equipment. Who knows what they'll find and more importantly what will the Dicers uncover when a nearby defence force responds to the Orks presence??
That's a way off yet though. Our next mission will be "Airfield Assault" early next year.
We hope you've enjoyed reading about this as much as we enjoyed playing it. Thanks for reading and stay tuned for more Cypra preparation. Also keep an eye out for our upcoming series of posts: "Lords-a-Reaping" as the code show what mighty war machines they're painting throughout December!
Bluddtoof.
.


 As
As 


