Showing posts with label Transfers. Show all posts

Friday 28 October 2016

Arming for the Cypra Incident - 19th Dicers Armoured Column - Completed (Hobby Season Completions)

Hi All,

As promised here I am back with a mass of completed hobby season goodness.  This work has all been completed so close together that I feel rather hobbied out!  So this takes me to a ready to go position for our next Cypra Incident game "Running the Gorklet".

So no apologies this is going to be picture heavy and I feel very proud of the work I have achieved on this army this year.  This campaign has really helped me motivated me to get a new army on the table.  Anyway self congratulating back slapping out the way what have you painted Doc?

 WIP Tanks

 First off just wanted to show a couple of work in progress shots to give you all an idea of the pre shading I completed on the tanks using the airbrush.  I love this technique and the time it saves.


Friday 15 July 2016

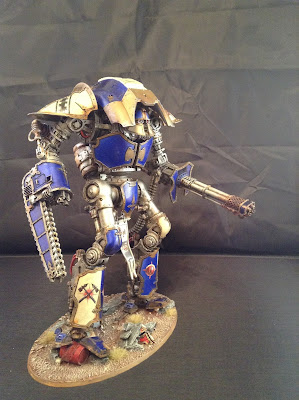
Cerastus Knight Acheron Showcase - House Makabius

Hi all,

Doc here back with the finished knight as promised.  The weathering process was just a load of real fun and very dirty!  So on to some pictures and few salient points. Firstly also to thank Innermech for the loan of the light box.

All the previous posts on this project can be found here, here and finally here.


So the obligatory front on shot first.  The imperial knight helmet has been painted to match Boss Bludtoof's knight (just had to be! and for info his knight can be found here).  A couple of minor things remain to be done the symbol of allegiance and a coat of varnish to seal the powders down.


This view shows the knight crunching a barrel I envisage the barrel would literally be as flat as pancake after a knight stood on it but thought it broke up the base in a different way.  There are also bits of metal, grave stone, rocks, skulls and bushes dotted around the base.  On the shoulder pad the transfer has also been highlighted as I noted not all the transfers were highlighted,  I thought about blood on the reaper chainsword and then decided against it, although I might go back and add it.  What do you guys think?


On to the other side and certainly the hardest part to put together a whole load of patience to get the feeder tube in the right place and a lot of use and my wife's hairdryer.  Painting wise I went for the scorched look on the gun and then slowly reduced the burnt affect the further away from the barrel.


The back not so exciting but still lots of work.  This shot shows the spot colour of red I used on the pipes and shows a lot of the weathering off particularly on the tank and vents at the top of back.

Overall really happy with him let me have your thoughts people of blogosphere!

Cheers

DOC out..........


Friday 8 July 2016

Cerastus Knight Acheron - WIP #2

Hi All,

Wowsers I have been away from the blog and hobby for a while, apologies for that and now it is time to get my mojo back! It is also bad timing as traditionally code40k members tail back the hobby work over the summer months meaning blog posts have been a little thin on the ground.  Anyway trying to get back going again now...

So I have gone back my Knight Acheron and for those of you who need reminding or missed it the original build post is here and the first WIP is here.

In order to go any further I need to get all the waterslide transfers in place or decals depending on where you are in the world.  I have bought the House Makabius set from forgeworld.  This is mainly because I intend to paint 4 knights in this colour scheme.   Over the years transfers have been a bane and I still dont like them but since switching to the Micro -Set and Micro Sol method it has become easier.  I would recommend the following youtube video for an explanation:


And the following video as a tutorial:


Here are some photos of the transfers in place before weathering:


My main top tip for this post is to always apply the transfers before weathering which is a mistake I made a while back. To not do so means they look out of place and pristine with the rest of the model looking weathered.  As you can see from the pictures above I have successfully applied all the transfers.  The most difficult transfer which is not pictured is the banner transfer which hangs between the legs.  The banner is curved and the micro sol came in particularly handy for the banner piece.

So with transfers applied the next stage will be to complete the base and then finish weathering followed by completed assembly.  I hope to show you a completed knight in the next two weeks.

So nice to be back in the saddle 

Cheers

DOC out


Saturday 14 May 2016

Showcase; Deimos Pattern Relic Predator Executioner, Thunderbolts Chapter of the Adeptus Astartes.

Hi All

Finished my new predator executioner and very pleased with it too. I've swapped to Vallejo foundation white instead of Citadel ceramite white, it's not as opaque but it flows better off the brush and along with a new thinners; Tamiya X-20A, it's much easier to use. The final result is less solid white and allows the Fenris grey base coat to show ever so slightly giving the white a very nice blueish tint. I likes it! works nicely with the ice blue spot colour.

some piccies...


With the transfers and iconography I've stayed with the V for my chapters "5th forging"; the equivalent of a codex company, the Thunderbolts use a more flexible organisation than the rigid codex system due to their long affiliation with the adeptus mechanicus based on the forge world they established their fortress monastery on. This affiliation has led to their predilection for vehicles and a larger than usual number of tech marines. The chapters organisation is largely formed around the many forges they maintain and it is a rare force of Thunderbolts that does not contain a tech marine and his mechanical charges.

Next up for the Thunderbolts will be a Typhon heavy siege tank but first I'll be concentrating on my newly delivered Deadzone 2 goodies in the shape of some plague reinforcements and a new industrial scenery set which will probably see action in future instalments of our narrative campaign; The Cypra Incident.

Hope you like the new tank, C & C as ever welcome.

Bluddtoof.

Tuesday 16 February 2016

40K Imperial Guard Tanks Showcase - 19th Dicers

Evening All,

Doc back with another block rocking beat......

Eh no back with another blog posting video...

Ok give up with the crappy jokes already.  Tonight I want to showcase my finished tanks for the first two games of The Cypra Incident.  Really happy with the end result and enjoyed the weathering process immensely.

Before I launch into the new stuff in case you haven't been following the progress on arming for the Cypra Incident please click here.

Ok first off a few photos for new models I have finished alongside the tanks:


I have another 26 models on the go at various stages.  I am using a mixture of models to represent the army from cultists, forgeworld, catachan guard and necromunda figures.  I think this creates the feel of an army on the verge of turning away from the imperium having been abandoned on backwater planet.

Next up is the main showcase video for the tanks.  This time I have gone for a showcase video as opposed to a picture of my shiny head (thanks INNERMECH!).  3 of these tanks are old models which have been stripped and re painted which has worked really well.  Hopefully this will be the last time I repaint them!


As always please leave your comments and suggestions for improvements.

Thanks

DOC out

Sunday 24 May 2015

Pre Heresy Death Guard Legion Rapier - Showcase

Afternoon All,

I am here to finally showcase something I have painted in 2015 on the 24th May!  Wow that's real life for you. Today's showcase is my newly finished Legion Graviton Rapier.  I am really looking forward to getting into 30k and this is another step in the road.  Hopefully in January the CODE40k group can finally have our first game of 30k.  This will follow nicely on from our usual December event here on the blog.

In any case that is a long way off and I need to get more models built and painted for then.  Back to the rapier; the model you may notice, is missing the spindles from the cannon.  I have them I just don't like them so have deliberately omitted them. Secondly and this is where I need some advice the main barrel of the cannon is slightly warped.  I have heated it up and tried to correct this but once it cooled it returned to the same warped shape. Any advice on this would be cool please??

The model itself uses sponge weathering techniques and weathering powders to achieve the war torn look I am going for with my Death Guard.  I was tempted with more OSL from the blue light source within the barrel but having tried it I didn't like the finish so backed away from that idea.  I also changed out the plume head for a none helmet head on the pointing marine just to make mine look a little different to others. Also I thought the plume head would come in handy for a sergeant model later down the line.  As always constructive comments are most welcome:


As I have finally got started for the year I have awarded myself 10 painting points!

Next up more Death Guard...

Thats all folks

Doc Out

Sunday 18 January 2015

Pre Heresy Death Guard - Showcase of Progress So Far

Evening All,

Doc here to showcase the progress on my Pre Heresy Death Guard (PHDG).  For those that haven't read any previous posts the idea with my PHDG the idea with the army was to always create a multi use force for 30k and 40k as a space marine army.

Its also meant to use all new the skills I have been perfecting across an entire army.  The project has certainly evolved since I started.  I have realised I will use more forgeworld models than originally intended.  I think when I finally get round to 30k I want the look of 30k.

Onto some completed models.  Tactical Marines:


 This is all the tactical marines I have painted so far and as you can see I'm covering off lots of armour patterns!  Later on they will be organised into squads of the same armour pattern.  It will also aid on the battelfield when two squads get near each other.  There is still some transfers and weathering to do to tie them all together.  This hasn't been done as I haven't fully decided my methodology. The most recent additions are the forgeworld MK3 marines which I have taken some close up shots of:


 These models utilise the sponge weathering used on the contemptor dreadnought showcased last week here.   I will be adding some weathering powders on the lower legs and then I consider this to be the finish I want.  Weathered but without removing too much of the white.

I have also made progress on a 40k Sternguard squad in the same colour scheme:


 Only 4 done so far but on the whole happy with the finish.  Although I will be fixing the error on the heavy flamer back pack, followed by transfers, sponge weathering and weathering powders.  This army really is a slow burn but hopefully in the end it will be worth it.

A couple of posts ago I published my hobby objectives for 2015, and getting this army to a playable state this year would be a fantastic achievement!  I have many more models started so now I just need to knuckle down and get some more finished.

This weekend in true DOC style I started some more.....


 Hopefully these will meet the undercoat can in the next two weeks or so (Weather dependent).  For info I have deliberately left the other arms off the heavy legionnaires.

Well that is me for a bit comments and feedback always welcome.

That's All Folks

DOC Out


Monday 10 November 2014

Imperial Knight Freeblade, W.I.P, carapace on.

Hi All

Bluddtoof here with an update on the WIP of my Imperial Knight Freeblade.
As you can see I've now completed the upper carapace with lots of lovely thorny vines.
Here's a few piccies....


I'm now working on the arms and attempting to magnetise the shoulder pads so I can keep the arms removable. Tricky tho as the magnets I have are a bit large, I'll be sourcing some smaller ones.

That's it for now, more to come later...

Bluddtoof.

Saturday 1 November 2014

Imperial Knight WIP, torso done and in place.

Hi All

I've finished the torso of the Knight and it's now fixed in place, after a little dry run to get the positioning right. Whilst doing the dry run with arms and shoulder pads in place I discovered that the arms cannot be removed if the shoulder pads are fixed in place as the overhang at front and back stops the arm assembly from fully rotating. So, once I get to the arms I'm going to have to decide if pinning the pads in place onto the shoulder frame will work, as that's the only way I'll be able to have removable arms. I like the idea of removable arms for purposes of packing and moving and also to represent weapon destroyed results.
Anyway enough of that for now, here's a few piccies of the Knight so far....


The next step is the top carapace, more on that to come soon....

Bluddtoof.