Monday 30 January 2012

My Little Tank(s)

Hello!
It's been slighlty later arriving than I'd planned, and since these pictures were taken I may also have undercoated these blighters...

But here we have a group of 12 Grot Tanks, hand crafted by Yours Truly.

Now, For anyone wanting to build Grot tanks, and look for a Good Tutorial, I can highly recommend Kanvass' tutorial on Youtube. The guy has crazy skills and if you follow his tute, you'll end up with some beuatiful looking models.

If you do it my way, you will probably end up some rather haphazard things (which I'm very proud of) which all do indeed look very different and hopefully are also fun to build.

To go into a bit of background on these (and I wouldn't recommend anyone follow the methodology behind my construction of these past the initial groundwork!) Last November, The Code Gang had a big apocalypse game. Beakies Vs Orks in the Return of the Battle for Big Toof. As is (apparently!) tradition, The Orks always need new, and bigger, and crazier toys.

The problem with this... is that I always leave it too late...
...which is how I came to find myself in my tracksuit bottoms, at 5am, finishing the construction of the last tank, the day we were due to play... and I hadn't done the rivets.

Needless to say I was *quite* tired (talk about an understatement!) on the day, and the game probably suffered for it (plus we put them into tactical reserve, and they didn't come on for ages, and were a bit disappointing on the day, but that's going down to User Error)
so anyway, enough waffle.


Here are some tanks!


and this is an explanation of how I made them!


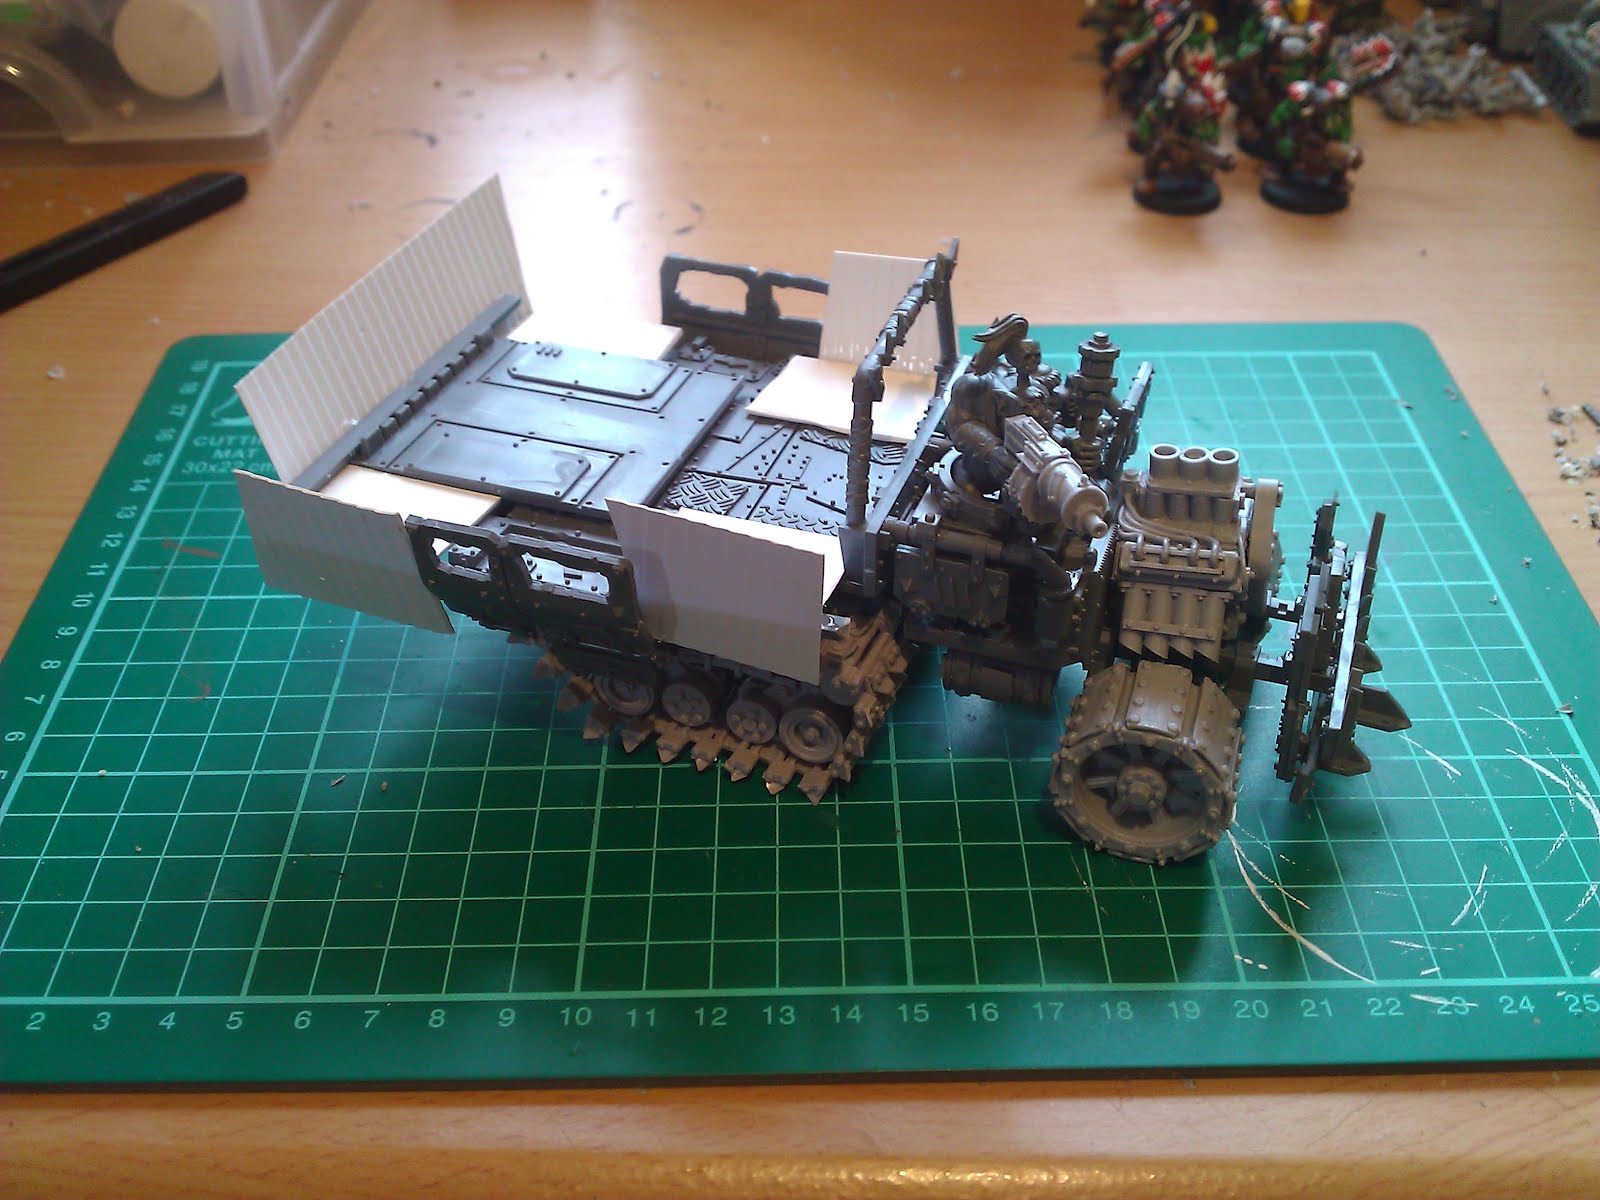
Every tank's basic shape is constructed in a roughly identical fashion.


One track is made of the following.


2 pieces of Plasticard 20mm x 30mm

1 piece of blue insulation foam 18mm x 28mm

1 piece of thin plasticard scored lightly (this simply needs to be long enough to go around the tread which means, roughly, it should be 110mm (extra 10mm is for wrap around gluing factor)


then as you can hopefully see from the pictures, I've angled each tread to hopefully mak it look a bit more tank like, this is absolutely to personal taste. Here do what you want, just make sure that each set of 2 treads per tank are the same!


so, for one tank, you will need double the above.


PVA two pieces of matching plasticard to one piece of matching blue foam and let set.

Then PVA the entire facing of the blue foam that is showing in 'the sandwich' and wrap you scored thin plasticard tread around (bending it it around the angled treads in the places it needs to), using the overhang and some polycement to stick the tread to itself.


now for the chassis.


you will need


4 pieces of Plasticard 20mm x 30mm (These are 2 x sides and 1 x front and 1 x back)

2 pieces of Plasticard 30mm x 30mm (this is the top and bottom)


It's basically a square. Now you can angle these as well, but I happen to think they look best with only 1 angle cut, either front or back. (but again, your mileage may vary)


If you angle it, be aware that you will need to shorten one of your front/back sections accordingly, and cut a new angled frnt/back section to match.


Polycement these all together to make your boxy tank body shape.


Then take your 2 x treads, and polycement them to the body of the tank.


you now have your basic shape.


From here, hopefully, the rest should be fairly straightforward. using 10mmx10mm pieces of plasticard, you can make the gun turret, or, shoudl the fancy take you, use other GW cupolas from other tanks (as I have done on a few of them)


alternatively you can use a hemisphere to make your turret... the key is that you do something a little different somewhere on the tanks!


to make them look a little less like homogenous boxes, I also used a lot of plasticard extra plating, and cannibalised lots of unused Killa Kan/Truck/Orky parts to individualise each tank.


Rivets are also key. To be honest, I think I went a little overboard on the Fighta Bomma... (coming next!) However, where Ork Vehicles are concerned, rivets are what takes it from a scratchbuilt piece, with very flat panelling (and looking a bit simple) to something that could conceivably have been cobbled together by some crazy Mek!


So later on this week, I will show you how Gruber's finest Little tanks look with a bit o'red paint on them (I think it's made a huge difference) as well as a certain Butchered up Italieri kit and some more rivets morphed into a Fighta Bomma!


Hypa Out.

Saturday 21 January 2012

Red Mist Descends

Hi Code Fans,

Red Mist here for his first blog outing. As you know were all building up to SVAXII and I'm busy painting transports for my beloved Catachan 7th Imperial Guard Army (Dutch's Desperadoes).

The men are all done bar one and I'm now on to Chimeras for my vets, IG never leave home without them. Attached are some WIP so far, got 3 do do in total. Have just finished a manticore and a converted Hydra, will upload some pics of these soon.

What you might not know is that I also collect a Necron army, DOC and myself decided to pool our armies and build them up together so we can get all the options covered as well as saving us both some cash (times are hard after all), so I've just started work on Imotek the Stormlord (my first Finecast Model) will they stand up to the riggers of playing, I don't know, as them seem very delicate.

To start with the rod weapon of his was bent to buggery... as well as being bent left to right it as also bent front to back. I made the mistake of  showing my wife this and before I knew it she had snapped it clean in two, word of warning finecasts and wifes don't go.

Any way after an hour of glueing, swearing and twisting in hot water I managed to fix it as best I could and here he is ready to paint, oh and the valve of my black spray can broke off when I opened it, joyous.

Well me signing off for now, keep and eye out for more posts and pics soon, the clock is ticking...

RED MIST

Wednesday 18 January 2012

Waaaghhh!!!!!! Bluddtoof wip

With SVA XII and Carnage looming close I'm getting a few new bits and bobs together for my 5 new lists I'll need for them. Sounds a lot but as my Orks are my most prevalent painted stuff I've got the vast majority of what I need already done.
Just built Trukk number 5 and here's a few photos...........
As you can see I've used the Forgeworld Ork half trakk upgrade kit, not a bad price considering you get a full plastic trukk kit as well as all the resin trakks, wheels and engine. You're left with plenty of extra bits, specifically wheels and an engine with which to make another trukk!! Huzzah!! 2 trukks for about £35. As long as you've got plenty of bits lying around, which any self respektin Mek should have or course!
So the kit........
...as with all resin..... FLASH! And plenty of it, especially around the trakk linkages, take your time and it comes off with a nice sharp craft knife to leave a really impressive mould, well impressed with the quality and Orkyness of the design.
Not too tricky to assemble either but you have to remember it's Orky so it's meant to look uneven and wonky and once I'd done the chassis it looked good and was quite strong and rigid.
The engine blokk is made to connect to the drive shaft of the plastic kit as with the original however the resin gearstick was a pain to get in place so I ended up swapping it out for a scratch one. Don't try to use the original plastic one as it won't be in the right position and hits the front bulkhead of the cab section, stopping correct positioning of the cab.
I also bought the Forgeworld Ork weapons set which is a fantastic assortment of Big Shootas, Skorchas and Rokkit Launchas; 11 weapons altogether with mountings and all unique too. So one of those went on in place of the original plastic one. All helps to create the desired impression of each vehicle in my Waaaghhh! being a unique creation of the competing Meks.
I'm now working on Trukk 6 which again uses Forgeworld upgrades, this time the Enclosed Kab Trukk kit. Piccies of this in due course........
Waaaaaaaaaaaaaaaaaaaaaaaaaaaaaaaaaaaaaaaaaaaghhhhhhhhh!!!!!!!
Boss Bluddtoof

Tuesday 17 January 2012

This years objectives

So another year beckons, and this year I'm setting objectives which I will achieve!!!!
Last year was a total washout on the objective front, with one thing and another.

So my objectives for 2012.................

1/ Complete Space Orks 1750/2000 pt lists for the Carnage and SVAXII tournaments in late march. (Not too much to do now; paint 2 trukks, 3 buggies, 10 assorted infantry.)

2/ Finish my Klawstompa!!!

3/ Design, build and paint a Kustom Stompa!!! (Bringing my collection to 3 Stompas!!!!!!)

4/ Take a break from 40k.........and............

5/ Start my First Fantasy army in over 20 years!

This will be a Bretonnian army, and yes I know they're a bit weak in the new edition, in desperate need of a new army book but this will be a long term project and I'm unlikely to have a painted army this year so hopefuly by the time I'm ready to take to the field of honour the new book will be here.
Most important to my decision to go with Bretonnians is that I can paint every knight as an individual, with his own unique colour scheme and styling. Only the plebs will need to be painted in uniform, which is good 'cos my downfall in the past has been that I get bored painting lots of identical models and thus my previous fantasy forays have ended prematurely with 1/2 painted units.

I'm not gonna set a target number of models, just paint as much as I can and enjoy the experience.

On that note I played my first game of Fantasy since the early 90's at the weekend and thoroughly enjoyed it! So Huzzah! Soon my glorious Knights will take to the field and smite all those who would turn a wicked eye to those lands under the protection and blessing of the lady of the lake. Have at you Cur!!!!!!!!!

Sunday 15 January 2012

Ghost Ark and Glue Nightmares

Hi All, Since last weeks post ive played 3 games with the crons and painted a Ghost Ark. Be warned a Ghost Ark is a difficult kit and required many sub assemblies and paint before be finally put together. I also had a little accident along the way where by i spilt an entire bottle of liquid poly over the 10 repairing necron warriors whilst they will still in pieces on my cutting board. After screaming at the top of my voice i managed to save all the components although some have lost some detail as the liquid poly melted them. So here is some pictures of the completed model some genuine feedback is always most appreciated and i will say i really took my time to get the finish you see here but would still like to improve it further if possible. I also followed Luko Dakka's advice and applied gloss varnish to all the green necron power sources on the model this inluded the guns, orbs and engines. If anyone would like to know anything else about the model leave me a message? and i will endeavour to give a usefull response.
Id also like to share with you mine and red mists basing strategy for the necron army which is snow and dead world theme. We are using a dead looking static grass and a snow paste. In addition i found some green crystals on www.wayland.co.uk called anarchy crystals. We felt these matched perfectly the power source green running through the army.
Another step completed towards the 2012 objectives list.... Until next time DOC