Showing posts with label Imperial Knight. Show all posts

Tuesday 1 November 2016

Omnissiahs Repugnance and Kill Team fun days!

Hey hey girls and guys, Bristles here with an update of what's been going on in my little corner of the hobby!
Firstly I'll start off with my most recent completion. 

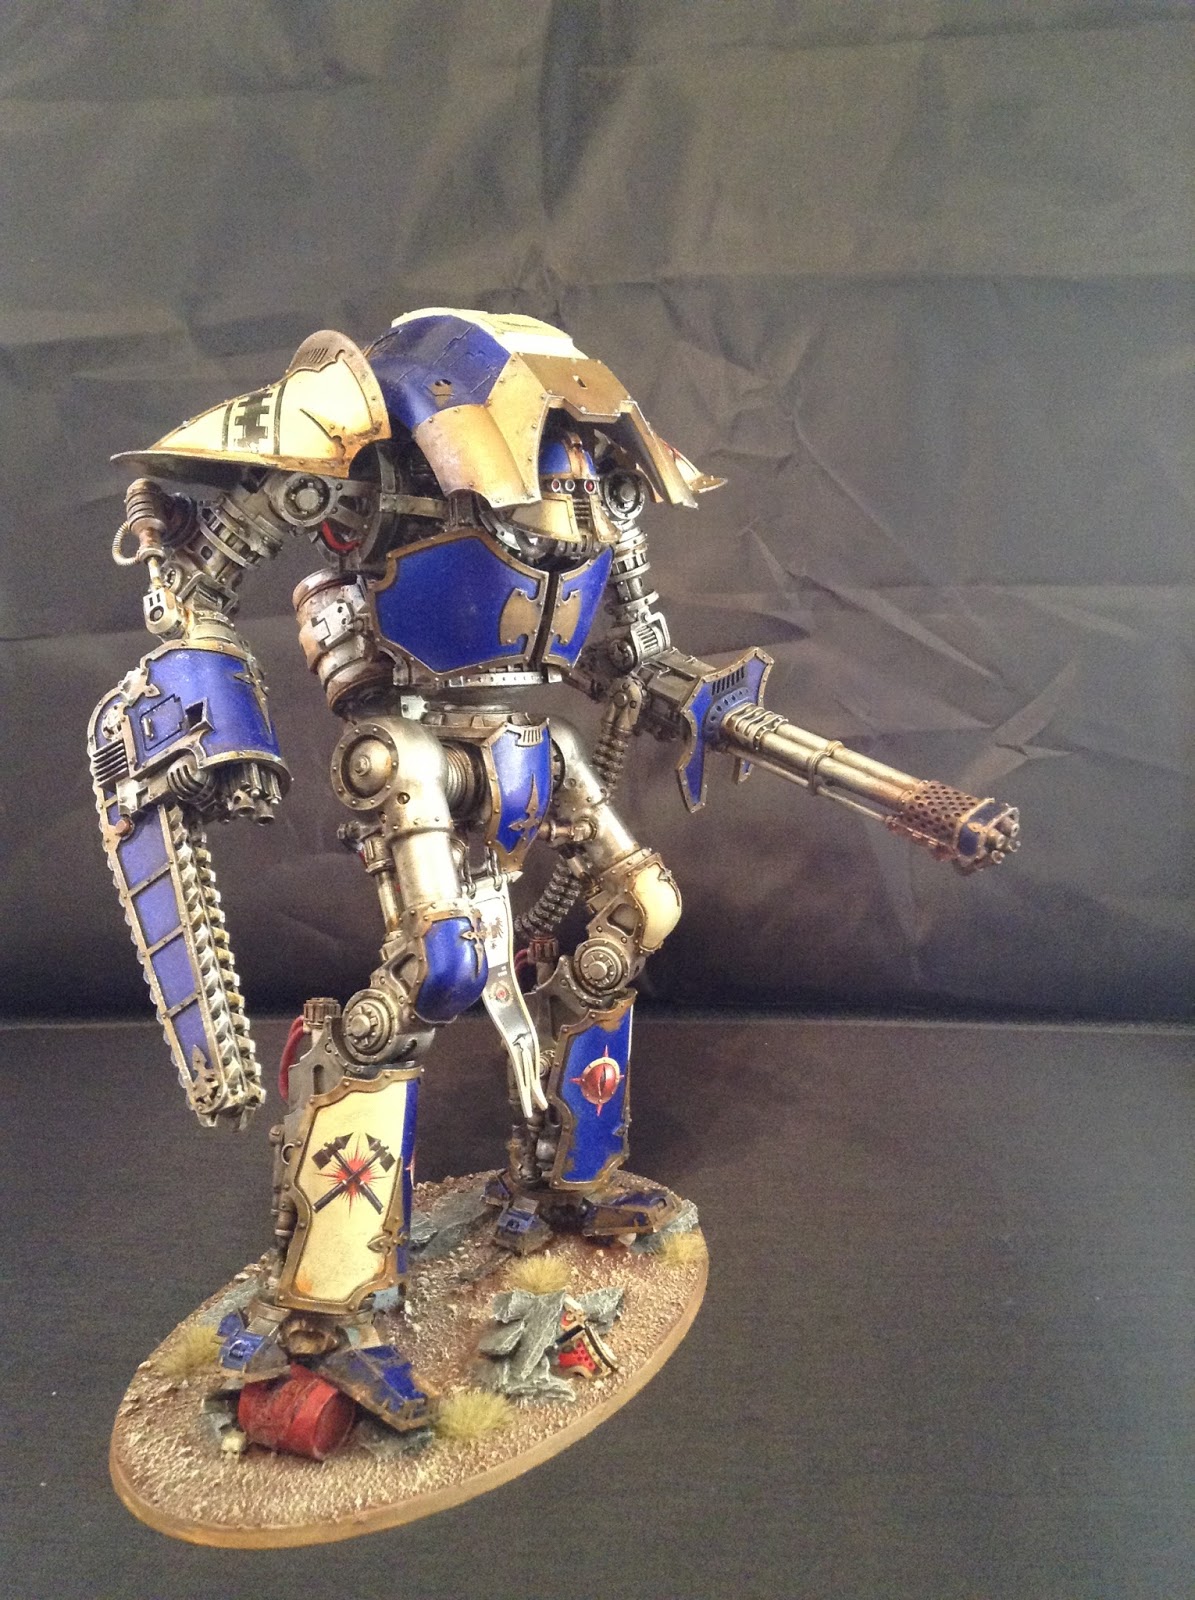
This is 'Omnissiahs Repugnance', the newest member of my own (as yet unnamed ........ suggestions on a post card!) Mechanicum aligned Knight Household. 


Basically, there's a singles tourney coming up and I decided I wanted to run my knights as they never get out enough but to get near the points total I'd need to acquire one more. Hence, the Acheron. Because it's so awesomely brutal it would have frankly been rude not to. And I'd seen the new Knight helms from FW at the open day a few months back and decided this would be a great time to give one a whirl......I think it looks perfect on the body!

Anyway, as always, bases are just as important to me as the model (a well painted model on a good base will look great but an incredibly painted model on no base will always look unfinished in my opinion), so I took this opportunity to have a play and see what I could come up with. 
Fortunately I have a friend who's dog has a rather "PURGE THE XENOS!!" Outlook to life so he was able to supply me a rather mangled Dark Eldar flier and thus the theme of the base was set. 

I was scratching my head for a long time as to how to approach painting the base before having a bit of a brain wave and getting stuck in with the FW clear paints.....


Once the bulk of the base colours were down it was just a case of getting it all painted up together and weathered! Here's a few shots of him complete..


Let me know what you think!

Ok next up is a bit of a taster for what's to come in my next post.....
A Kill Team tourney over in Cheltenham with some of us from the Code ( Luko Dakka, Inner Mech and My self long with another of our friends) hosted at the Porkchop Gaming Venue with lots of swag supplied by the awesome guys at https://www.incomgaming.co.uk/
I'm trying desperately to get hold of some pics from the day and write up a lovely report for you all but clearly I'm not applying the correct sacred oils because nothing is forth coming as yet........leave it with me, I'll make it work!!

However, whilst there we were able to pick up some of the sweet new battlemats we had ordered and boy oh boy are they pretty.....


Fantastic detail, really can't wait to have a game on this beaut and the guys over at Incom Gaming sorted us out a treat - cheers guys, now we just need to meet up and throw some dice down! 

Ok, that's enough of my waffle for now so I'll let you all go in peace and I'll do my best to put together a report of what actually transpired during the Kill Team day........sneak peak....it came from the shadows and was bloody and brutal. 

All praise the four armed Emperor. 

Tuesday 30 August 2016

Showcase; Imperial Knight Errant, Winter Effects Weathering

Hi All

Bluddtoof here, finally I've got round to finishing off the weathering on my Freeblade Knight Errant. It's only taken me 2 years!
So I was really quite nervous about this little project; the knight is probably my best work to date, I was very concerned I'd mess up the finish with poorly done weathering, I'm not experienced at all with weathering.
I'd done quite a bit of research on different methods and materials over the last year or so, a lot of advice came from my code40k colleagues, a big shout out to the boys for the help!
I bought a winter effects kit a while back that has quite good instructions included, Scene- A-Rama is the brand, and I experimented a bit with the various materials with mixed results.
The "snow base" liquid makes an excellent base layer for applying snow in the form of flock or powder, the snow powder in the kit is made of crystals of varying sizes all mixed up, I used it in conjunction with GW snow flock and Bicarb, applied in different layers for the final finish. This came after a great deal of playing around. Some of it I then coated in the "Ice Effects" liquid, a thickish clear resin that sets real quick.
All of this worked ok and was pretty easy after I'd worked out the method.
The tricky bit was Icicles, I knew I wanted the knight to be crusted with icicles hanging from the shoulder guards and carapace to simulate it having stood sentry for ages in sub zero temperatures and now just awoken to the call to arms. The kit has instructions to use the ice resin to make icicles...... it doesn't work, I tried and tried and tried, the resin just spreads and makes an icicle shaped flat sheet.... no good for the application I wanted..... so.... Luko Dakka delivered the solution with a quick explanation of how he used melted flying stems.....some practice later..... and Icicles I'm really pleased with! Hurrah! A word of warning tho if you try the melting plastic method...open a window and wear a face mask, nasty fumes.
In case you've not tried it here's my method I used....
Over a tea candle, hold a flying stem at both ends with a pair of needle nosed pliers in each hand. Hold the stem about 10-20mm above the flame, too close and it will scorch and even ignite...that was an interesting minute or so! Too high and you'll be waiting a LONG time. Keep a close eye on the surface of the plastic, it will start to develop fine striations and very shortly it will sag visibly.. Immediately apply a little tension and REMOVE from the heat, keep the gentle tension applied and the stem should quickly stretch very thin, keep pulling gently and the plastic should keep stretching with the thick end bits slowly feeding into the thin middle bit, you'll feel the resistance increase gradually, keep applying gentle tension until it won't stretch any more. You should now be able to let go and you'll have a long piece of plastic with a really thin middle section flaring out at both ends to fat bits. Chop this in the middle and cut/shape the fat ends to create the bit that connects to the surface the icicle will hang from, 2 icicles from 1 bit. You can then go on to do the same with the chopped of ends too if they're big enough.
This took me a few attempts to get right, it's very much a matter of FEEL with each piece, if you pull too fast it'll snap and then curl up.....ruined! Pull too little it'll just sag, too long over the heat...sag, burn, mess! Thankfully clear plastic flyer stems are cheap and plentiful, you generally get extras with any skimmer model.
One thing I did find tho was that once you've melted a piece and let it set again it doesn't melt cleanly ever again, I'm sure a chemist could explain it!

Anyhoo, enough blather! Piccies....


As you can see I haven't applied a huge amout of snow on it, I didn't want to obscure the paint job too much but I wanted it to look like it had recently had snow fall which has been dislodged as it starts to move.
Hope you like it, I do, I'm very pleased with the finish and I'm looking forward to rest of my Knights and trying different winter effects methods on them.
As ever C&C welcome....

Bluddtoof

Friday 15 July 2016

Cerastus Knight Acheron Showcase - House Makabius

Hi all,

Doc here back with the finished knight as promised.  The weathering process was just a load of real fun and very dirty!  So on to some pictures and few salient points. Firstly also to thank Innermech for the loan of the light box.

All the previous posts on this project can be found here, here and finally here.


So the obligatory front on shot first.  The imperial knight helmet has been painted to match Boss Bludtoof's knight (just had to be! and for info his knight can be found here).  A couple of minor things remain to be done the symbol of allegiance and a coat of varnish to seal the powders down.


This view shows the knight crunching a barrel I envisage the barrel would literally be as flat as pancake after a knight stood on it but thought it broke up the base in a different way.  There are also bits of metal, grave stone, rocks, skulls and bushes dotted around the base.  On the shoulder pad the transfer has also been highlighted as I noted not all the transfers were highlighted,  I thought about blood on the reaper chainsword and then decided against it, although I might go back and add it.  What do you guys think?


On to the other side and certainly the hardest part to put together a whole load of patience to get the feeder tube in the right place and a lot of use and my wife's hairdryer.  Painting wise I went for the scorched look on the gun and then slowly reduced the burnt affect the further away from the barrel.


The back not so exciting but still lots of work.  This shot shows the spot colour of red I used on the pipes and shows a lot of the weathering off particularly on the tank and vents at the top of back.

Overall really happy with him let me have your thoughts people of blogosphere!

Cheers

DOC out..........


Friday 8 July 2016

Cerastus Knight Acheron - WIP #2

Hi All,

Wowsers I have been away from the blog and hobby for a while, apologies for that and now it is time to get my mojo back! It is also bad timing as traditionally code40k members tail back the hobby work over the summer months meaning blog posts have been a little thin on the ground.  Anyway trying to get back going again now...

So I have gone back my Knight Acheron and for those of you who need reminding or missed it the original build post is here and the first WIP is here.

In order to go any further I need to get all the waterslide transfers in place or decals depending on where you are in the world.  I have bought the House Makabius set from forgeworld.  This is mainly because I intend to paint 4 knights in this colour scheme.   Over the years transfers have been a bane and I still dont like them but since switching to the Micro -Set and Micro Sol method it has become easier.  I would recommend the following youtube video for an explanation:


And the following video as a tutorial:


Here are some photos of the transfers in place before weathering:


My main top tip for this post is to always apply the transfers before weathering which is a mistake I made a while back. To not do so means they look out of place and pristine with the rest of the model looking weathered.  As you can see from the pictures above I have successfully applied all the transfers.  The most difficult transfer which is not pictured is the banner transfer which hangs between the legs.  The banner is curved and the micro sol came in particularly handy for the banner piece.

So with transfers applied the next stage will be to complete the base and then finish weathering followed by completed assembly.  I hope to show you a completed knight in the next two weeks.

So nice to be back in the saddle 

Cheers

DOC out


Friday 22 April 2016

Cerastus Knight Acheron - WIP #1

Morning All,

I have been working away on my knight acheron.  I wanted to get it to a usable state whilst I await delivery of transfers to finalise the model.  I have taken the odd photo along the way to show you some progression.  This has been a really enjoyable process so far and I look forward to the final model being finished.


I had already decided to loosely follow the House Makabius colour scheme although I decided on a metallic brighter blue than the forgeworld example.  To test it out I just did one shoulder pad.   The airbrush finish on the blue and cream is so flat and makes me wonder why I would ever do it the "old way" again.  At this stage no washes had been applied.


From here I upscaled to multiple panels including masking the shin plates to ensure a crisp line between the cream and blue.  For info I use the tamiya masking tape range for this purpose.


Snap from a couple of nights ago showing the chaos of it all


Flamer tanks completed.....  A whole mass of effects and mediums used on here.  Airbrushed vallejo silver.  Some areas airbrushed vallejo rust.  Then washed with agrax and nuln oil.  Drybrushed boltgun metal.  Next I went in with a whole load of effects to weather it up using the products below.


So as usual with me after this point got really into it and picked up the pace now I was comfy with the colour scheme and techniques below is a picture of the knight as it stands.  Still decals, weathering, base and many more little jobs to do.


What do you all think so far, any advice?  Hope to have it all finished in the next few weeks.

Cheers

DOC out

Saturday 2 April 2016

Cerastus Knight Acheron - The Build

Morning All,

Today I am sharing the build process for my Knight Acheron.  I have to say first off GW the instructions are rubbish! and has clearly been photocopied lots of times!

Anyway this my first forgeworld knight my other knight is a plastic kit.  The first thing to do is wash all the parts and make sure all the parts are present.  One of my friends has recently had a problem with forgeworld not wanting to replace a missing part without proof of purchase.  This was very frustrating after I was with him when he bought it for cash at a forgeworld open day.  Anyway after proving he ordered some other stuff for delivery on the same day they relented.  So guys advice is keep or get a receipt and check the parts when you get home even if you don't intend to build it in the near future.

The next thing I did because I knew I would do the build over several days is split the parts into sections bag them and label them as can be seen in the first picture below.

The first section I constructed was the body and cockpit, I have to say no matter what I did I couldn't get this to fully line up so in the end I went with best fit and have since filled the minor gaps with green stuff.  Top tip for any new folk out there elastic bands!  Also leave it a good while to go off.


Next I cleaned up all the armour panels although I have no intention of gluing any to the model until after the paint job has been completed.  Next top tip be careful around the thin bits of resin as you can see from the next picture.  I should not of used cutters in this area.  I think gently cutting away with a sharp knife would of been more sensible. I have since fixed this with green stuff and hopefully after painting and weathering you wont be able to tell!


At this stage I then realised I needed to design the base to allow me to start constructing up from the ground.  So I toyed with full city fight ruins and so on but then thought I don't always use models on city fight terrain.  So I scaled back to the design below and aim to have the one foot stood on the barrel.  The fantasy grave stone is more for a bit of fun and will be adorned with one of the code40ker's name for a laugh!  The knight head will also be painted to match one of the code players knights.


So from this point on I started to pick up speed as the excitement takes you onwards.  First thing was working out the foot on top of the barrel and I actually drilled and pinned the foot to it.   Once I had the first foot in place I blue tacked up the legs to work out where to position foot number two.  I wanted to ensure the hip joint wouldn't look to unnatural.


Ok so now I got really excited and stopped taking pictures of the process (woops).  So the next picture shows all the sub assemblies ready for painting.  I will say I used the hairdryer as per the instructions on the cables on the back of the legs.  Next top tip "You literally only need it on for 10 seconds tops"  any more and it goes very floppy.


Well that is the completed sub assemblies next I will consider a colour scheme as my other knight is Gerantus the Forgotten Knight (who can be found here) I will need to consider whether I go with another freeblade or consider a knight household?

Any questions, tips or thoughts please comment constructively below.

Cheers

DOC

Monday 7 March 2016

SHOWCASE CERASTUS KNIGHT-LANCER and a new hobby home


It’s been a while since my last post.

I have finished* renovating my new house and have moved in.
*in that it is liveable, with some odd jobs and touch ups still to carry out

Importantly I have got a space for my painting station


 It is near a large window, so has a great amount of light.

I have been able to spend a fair bit of time back on my models. We don’t have a TV in the living room now so that distraction is no longer there. More time for painting!

I started a Knight Lancer before I moved but it has been on hold for a few months. Anyway it is now complete.


BUILD/CONVERSION:

The base has an old broken rhino modelled on to it. This was a £2 purchase from eBay, which I thought I could save. It has been put to better use. The knight itself is pretty much as is. There was a slight issue with positioning of the legs as the pistons weren’t long enough so needed some green stuff to fill in the gap. Same for the power cable on that side. This is my first big FW model. It was quite easy to put together. My big bug bear is the lance. It has had 3 hot baths and still didn’t sit straight.

PAINTING/BASING:

The models are undercoated with Army Painter ultramarine blue and chainmail.

Blue: I thought the base was a bit pale, so I painted it in macragge blue to deepen it. I pained the recesses of the carapace with drakenhoff nightshade and highlighted in calgar blue. I should have washed the other plates edges but didn’t. I was hoping the gold would make a better edge. I was going to do another level of highlighting, but I’m going to see how this looks for a while. I would rather not have them that do them untidily
Gold: as per the recipe for painting stormcasts. It’s a little red than the gold I wanted but it’s a nice colour. The lance was done slightly different with a wash of the turquoise technical paint and a blue glaze
Metal: washed in nuln oil, highlighted in Ironbreaker and then dry brushed in Necron Compound, odd areas washed in agrax earthhade

I still have a lot of transfers to put on it to finish it off but I am pretty happy with it.

WHAT NEXT?

I had 2 presents of scouts so I have combined them.


The first is camo cloak scouts with silenced bolters. These fall in to the category of cool looking, but not good in game. 


I am lucky that I seem to have hit the point where I can now model units with options that aren't "competitive" as I have the "good" ones; these are for fun.

Second is another close combat squad. 


I am a few arms missing after the building the first squad, but I have some scout bikers turning ups so I may have some spare parts to complete the unit. This squad will need a Storm to carry them in.


I have built them, but I’m not sure if I want to paint them yet, mainly as I have started building a Castigator…….TBC

Sunday 29 November 2015

Review of the year....and obviously more marines


I’m going to discuss a little about my hobby experiences throughout the year.

Gaming: this year I have managed to play 12 games. I don’t think that 1 a month is too bad. I would like to play more, but I am not interested in playing at my local clubs and my usual local gamers like myself have very busy “normal” lives, so I don’t see this amount of games increasing next year.
I have now started to move house to a larger place. Hopefully in the course of the next few years I will be able to create a geek palace which allows me to have space for a permanent gaming area. My new place should offer slightly more space for my models but I think it is initially unlikely that they will have permanent place.
Painting/modelling: this year I have been pretty productive. I have managed to paint a range of squads and paint some of my terrain. I have been a member of a forums tale of painting which has focused me on painting at least 1 unit a month.
I have a set monthly budget for models and this year I have stuck to it well.  I have purchased most of the stuff I want to with only a few odds and sods not yet purchased (new data cards for scars and raven guard). I tried to do a log like doc where painting models unlocks money for new ones. Using a pretty similar scoring system to him I only managed to paint 50% of the money I spent. Maybe I should just double the points for each model painted!
This year I have done 2 new things, I have started my first knight and painted from scratch a large marine vehicle (Stormraven). Both of these are great models and I feel more comfortable painting them now.
Anyway here are some pics:

Another squad (2/5) of centurions


Stormraven just awaiting transfers


The start of the knight


Looking ahead to 2016. Hopefully I can clear my back log of models. I did a reasonable job this year and managed to clear 30-40% of stuff I had at the beginning of 2015. I need to go back and tidy up my battle company with correct shoulder pad markings and chapter insignia. This may take a bit of time but I think it will be worth doing.


I’ll sign off now as I need to prepare for the Code's special December treat for you all.