Showing posts with label Forgeworld. Show all posts

Friday 15 July 2016

Cerastus Knight Acheron Showcase - House Makabius

Hi all,

Doc here back with the finished knight as promised.  The weathering process was just a load of real fun and very dirty!  So on to some pictures and few salient points. Firstly also to thank Innermech for the loan of the light box.

All the previous posts on this project can be found here, here and finally here.


So the obligatory front on shot first.  The imperial knight helmet has been painted to match Boss Bludtoof's knight (just had to be! and for info his knight can be found here).  A couple of minor things remain to be done the symbol of allegiance and a coat of varnish to seal the powders down.


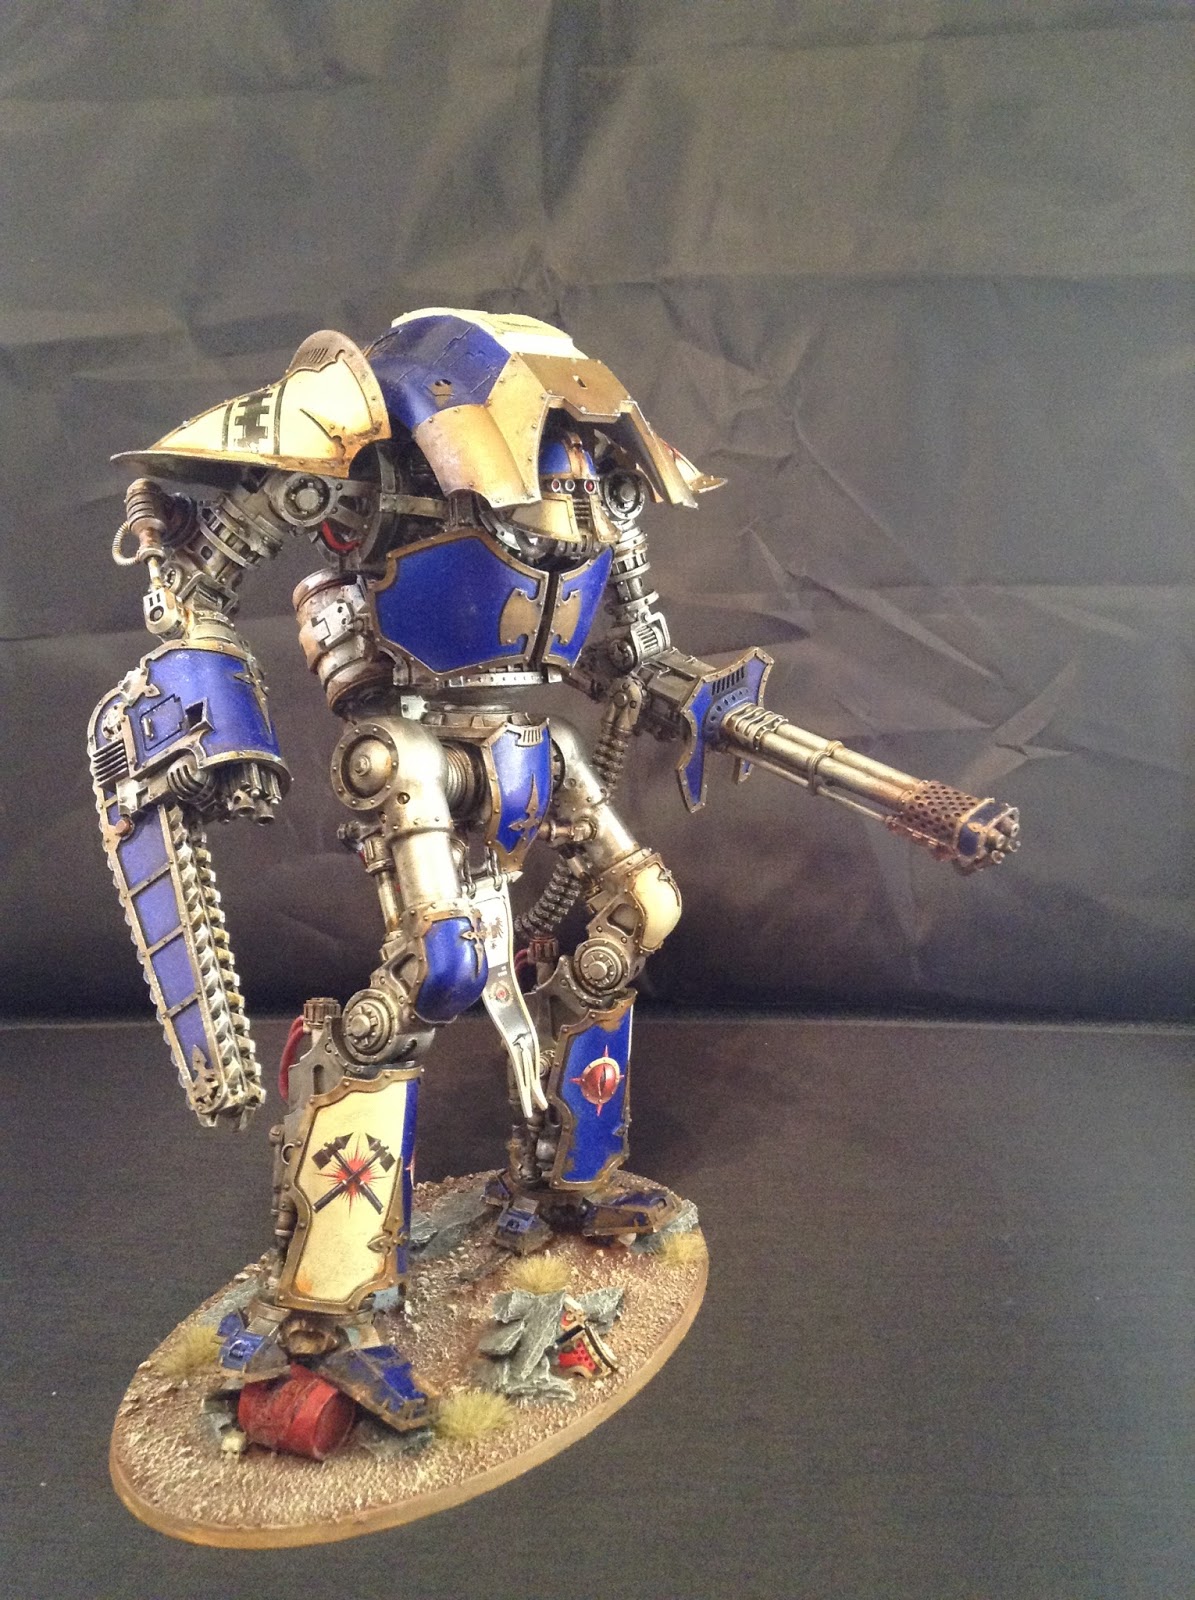
This view shows the knight crunching a barrel I envisage the barrel would literally be as flat as pancake after a knight stood on it but thought it broke up the base in a different way.  There are also bits of metal, grave stone, rocks, skulls and bushes dotted around the base.  On the shoulder pad the transfer has also been highlighted as I noted not all the transfers were highlighted,  I thought about blood on the reaper chainsword and then decided against it, although I might go back and add it.  What do you guys think?


On to the other side and certainly the hardest part to put together a whole load of patience to get the feeder tube in the right place and a lot of use and my wife's hairdryer.  Painting wise I went for the scorched look on the gun and then slowly reduced the burnt affect the further away from the barrel.


The back not so exciting but still lots of work.  This shot shows the spot colour of red I used on the pipes and shows a lot of the weathering off particularly on the tank and vents at the top of back.

Overall really happy with him let me have your thoughts people of blogosphere!

Cheers

DOC out..........


Friday 8 July 2016

Cerastus Knight Acheron - WIP #2

Hi All,

Wowsers I have been away from the blog and hobby for a while, apologies for that and now it is time to get my mojo back! It is also bad timing as traditionally code40k members tail back the hobby work over the summer months meaning blog posts have been a little thin on the ground.  Anyway trying to get back going again now...

So I have gone back my Knight Acheron and for those of you who need reminding or missed it the original build post is here and the first WIP is here.

In order to go any further I need to get all the waterslide transfers in place or decals depending on where you are in the world.  I have bought the House Makabius set from forgeworld.  This is mainly because I intend to paint 4 knights in this colour scheme.   Over the years transfers have been a bane and I still dont like them but since switching to the Micro -Set and Micro Sol method it has become easier.  I would recommend the following youtube video for an explanation:


And the following video as a tutorial:


Here are some photos of the transfers in place before weathering:


My main top tip for this post is to always apply the transfers before weathering which is a mistake I made a while back. To not do so means they look out of place and pristine with the rest of the model looking weathered.  As you can see from the pictures above I have successfully applied all the transfers.  The most difficult transfer which is not pictured is the banner transfer which hangs between the legs.  The banner is curved and the micro sol came in particularly handy for the banner piece.

So with transfers applied the next stage will be to complete the base and then finish weathering followed by completed assembly.  I hope to show you a completed knight in the next two weeks.

So nice to be back in the saddle 

Cheers

DOC out


Friday 22 April 2016

Cerastus Knight Acheron - WIP #1

Morning All,

I have been working away on my knight acheron.  I wanted to get it to a usable state whilst I await delivery of transfers to finalise the model.  I have taken the odd photo along the way to show you some progression.  This has been a really enjoyable process so far and I look forward to the final model being finished.


I had already decided to loosely follow the House Makabius colour scheme although I decided on a metallic brighter blue than the forgeworld example.  To test it out I just did one shoulder pad.   The airbrush finish on the blue and cream is so flat and makes me wonder why I would ever do it the "old way" again.  At this stage no washes had been applied.


From here I upscaled to multiple panels including masking the shin plates to ensure a crisp line between the cream and blue.  For info I use the tamiya masking tape range for this purpose.


Snap from a couple of nights ago showing the chaos of it all


Flamer tanks completed.....  A whole mass of effects and mediums used on here.  Airbrushed vallejo silver.  Some areas airbrushed vallejo rust.  Then washed with agrax and nuln oil.  Drybrushed boltgun metal.  Next I went in with a whole load of effects to weather it up using the products below.


So as usual with me after this point got really into it and picked up the pace now I was comfy with the colour scheme and techniques below is a picture of the knight as it stands.  Still decals, weathering, base and many more little jobs to do.


What do you all think so far, any advice?  Hope to have it all finished in the next few weeks.

Cheers

DOC out

Sunday 17 April 2016

Spartan Assault Tank - FW's Hardest Kit to Build?

Evening All,

Not been on here in a little while but have successfully built the hardest GW kit in the world the Spartan Tank.  More specifically the version before they changed the design and molded it with the tracks on.  I also made the mistake of trying to carry on with this when in a foul mood!  That as we all know simply doesn't work!

Anyway here is a few pictures showing the tank at various stages including the track bodge I ended up doing.  Once it is all painted and weathered I will cover up these issues.  For anyone else attempting this version of the kit GOOD LUCK.....

God Bless the elastic bands and the stolen from the better half hair bands!


Major track issues stemming from the front not being positioned right (during in the night in question!)


Picked the forgeworld brass etch for this tank.


The next two photos show the tank in primer and me starting to lay down the shadows.


Genuinely hated this build so glad it is out the way now.  This is not my current painting project but I will return to it in the next few months.

Thoughts on your experience with this kit would be interesting and also any good stories about when you should stop modelling might help!

Cheers

DOC Out!

Saturday 2 April 2016

Cerastus Knight Acheron - The Build

Morning All,

Today I am sharing the build process for my Knight Acheron.  I have to say first off GW the instructions are rubbish! and has clearly been photocopied lots of times!

Anyway this my first forgeworld knight my other knight is a plastic kit.  The first thing to do is wash all the parts and make sure all the parts are present.  One of my friends has recently had a problem with forgeworld not wanting to replace a missing part without proof of purchase.  This was very frustrating after I was with him when he bought it for cash at a forgeworld open day.  Anyway after proving he ordered some other stuff for delivery on the same day they relented.  So guys advice is keep or get a receipt and check the parts when you get home even if you don't intend to build it in the near future.

The next thing I did because I knew I would do the build over several days is split the parts into sections bag them and label them as can be seen in the first picture below.

The first section I constructed was the body and cockpit, I have to say no matter what I did I couldn't get this to fully line up so in the end I went with best fit and have since filled the minor gaps with green stuff.  Top tip for any new folk out there elastic bands!  Also leave it a good while to go off.


Next I cleaned up all the armour panels although I have no intention of gluing any to the model until after the paint job has been completed.  Next top tip be careful around the thin bits of resin as you can see from the next picture.  I should not of used cutters in this area.  I think gently cutting away with a sharp knife would of been more sensible. I have since fixed this with green stuff and hopefully after painting and weathering you wont be able to tell!


At this stage I then realised I needed to design the base to allow me to start constructing up from the ground.  So I toyed with full city fight ruins and so on but then thought I don't always use models on city fight terrain.  So I scaled back to the design below and aim to have the one foot stood on the barrel.  The fantasy grave stone is more for a bit of fun and will be adorned with one of the code40ker's name for a laugh!  The knight head will also be painted to match one of the code players knights.


So from this point on I started to pick up speed as the excitement takes you onwards.  First thing was working out the foot on top of the barrel and I actually drilled and pinned the foot to it.   Once I had the first foot in place I blue tacked up the legs to work out where to position foot number two.  I wanted to ensure the hip joint wouldn't look to unnatural.


Ok so now I got really excited and stopped taking pictures of the process (woops).  So the next picture shows all the sub assemblies ready for painting.  I will say I used the hairdryer as per the instructions on the cables on the back of the legs.  Next top tip "You literally only need it on for 10 seconds tops"  any more and it goes very floppy.


Well that is the completed sub assemblies next I will consider a colour scheme as my other knight is Gerantus the Forgotten Knight (who can be found here) I will need to consider whether I go with another freeblade or consider a knight household?

Any questions, tips or thoughts please comment constructively below.

Cheers

DOC

Thursday 31 March 2016

Showcase Cerastus Knight-Castigator

In my last post I was undecided if I was to paint up my scouts or start my second knight.

Well as you can see from the title I made my decision.

This is my CERASTUS KNIGHT-CASTIGATOR.


It is the same colour scheme as the lancer and here they are together. I still need to do the transfers, but i will do them both together now they are complete.


I am a big fan of this type of knight rather the the normal one from GW. My next purchase for the knights has already been made…..

In the long term want to complete a household, but I need to figure out how to get the “GW” knight to fit in with these taller models. Maybe I just have to build them all as crusaders with the top weapon to give the added height.

I am currently working on my 3rd squad of centurions. This time armed with heavy bolters, and I have started the camo cloaked scouts


I hope to have these done in the next few days when I can hopefully look to start either a fire raptor or a storm eagle.

Tuesday 16 February 2016

40K Imperial Guard Tanks Showcase - 19th Dicers

Evening All,

Doc back with another block rocking beat......

Eh no back with another blog posting video...

Ok give up with the crappy jokes already.  Tonight I want to showcase my finished tanks for the first two games of The Cypra Incident.  Really happy with the end result and enjoyed the weathering process immensely.

Before I launch into the new stuff in case you haven't been following the progress on arming for the Cypra Incident please click here.

Ok first off a few photos for new models I have finished alongside the tanks:


I have another 26 models on the go at various stages.  I am using a mixture of models to represent the army from cultists, forgeworld, catachan guard and necromunda figures.  I think this creates the feel of an army on the verge of turning away from the imperium having been abandoned on backwater planet.

Next up is the main showcase video for the tanks.  This time I have gone for a showcase video as opposed to a picture of my shiny head (thanks INNERMECH!).  3 of these tanks are old models which have been stripped and re painted which has worked really well.  Hopefully this will be the last time I repaint them!


As always please leave your comments and suggestions for improvements.

Thanks

DOC out

Sunday 14 February 2016

30K First Legion Dark Angels Showcase Video

Hi All,

Today is my first ever attempt at a post under the watchful eye of DOC! and also our first attempt at a showcase video.

I have spent the last couple of weeks working on my first legion for 30K and have tried a number of new techniques including OSL, Weathering, Sponge Weathering and airbrushing.

When painting black it is a reverse shading effect by painting the lighter colours on the underside in this case I sprayed vallejo dark sea grey followed by vallejo light grey and blended it vallejo black.

The bases were my first attempt at a Mars effect using forgeworld "Rust" weathering powder.  I felt
the bases were a great contrast to the darker colour scheme of the first legion.


Enjoy the video and please comment below as I would like to understand how to make them better!


We will be doing more showcase videos here on Code40K so please click subscribe on our new youtube channel.  Doc has already put a couple of videos for you to enjoy.

Cheers

InnerMech

Wednesday 3 February 2016

The Great British Build off - Heresy Arms Race - The Mechanicum

The Mechanicum
So heres my initial offering to the Code40k's group effort to try to get into 30k in a big way. I've plumped for a double helping of Heresy goodness. Since the 1st Heresy Book dropped I've been adding to a slow and steady Sons of Horus army but for this project I am concentrating on The Mechanicum.
Theres nothing more awesome than Big Robots kicking ass and since these dropped from Forgeworld I've been looking to get some. I am a big fan of the whole grimdark, almost steampunk aesthetic these guys have and I'm looking forward to getting them all built up so I can get some paint on them & get some games in. Heres a few I've built up recently: -

 Thanatar Siege Automata

 Myrmidon Destructors (3 more to build)

Thallax Cohort (13 more to build)

I'll post up as I add to the army and touch on potential army lists as I work to be game ready.
Still no idea on colour schemes but once I've decided i'll probably dive right in on the big fella, stramngely I find the bigger models easier to work on!
Until next time
LukoDakka out

Monday 25 January 2016

The Great British Build Off - Pre Heresy Death Guard - Masses Now Built, Re basing - Big Jump Forward!

Hi All,

DOC here to showcase a big leap forward on the construction of the pre heresy death guard.  Here follows a giant picture dump showing all the models I have built for the death guard.


Heavy Support Squad (troops for death guard with the rite of war mmm rockets)


Volkite Culverin Support Squad (nice to have some different weapons to 40k)


Command Squad - close combat squad nice to use some of those lovely mkIII power wepon bits


Legion Tactical Squad -fleshed out and sergeant added with a power fist 


 I have also in the build process re based a load of my death guard on to 32mms.  These are 40k marines as I will use this army in 40k as a space marine army.


Sternguard Vets - The best spare bit kit in the GW range!


Devastators - Mixed bag made from my bits box but all good!


Vanguard Vets and Chaplain - great models and again loads of bits!

So having bought 100 32mm bases I have no used them all up and ordered another 50.  I really am aiming to get this into a usable state before the painting begins.

Comments are welcome

Cheers

DOC